With the recent introductions of privacy focused laws, gaining user consent before deploying tracking tags and cookies has become the norm. You have probably seen a pop-up appear on most websites asking for your consent. Let’s take a look at building a simple cookie consent pop-up in Google Tag Manager (GTM) using JavaScript.
This post walks through all the steps to reach the end result, so I recommend reading through it. However, if you just want to see and use the final result; read the summary below.
The Plan
What should our pop-up do? As you can judge from the title, I want to keep this simple. The goal is to split out GTM tags between ‘strictly necessary’ and ‘optional’, so we can restrict firing the optional tags, if the user does not consent to them. It will also be a good idea to make this a standalone solution, so we can easily deploy it on any website (using GTM). This means we’ll embed our pop-up HTML and CSS inside the JavaScript.
I should emphasize here that this is mainly an excercise in the architecture and logic of building a simple cookie consent mechanism, not a tutorial on JavaScript. I will assume you are fairly familiar with both GTM and JavaScript, and so will not dive into every detail.
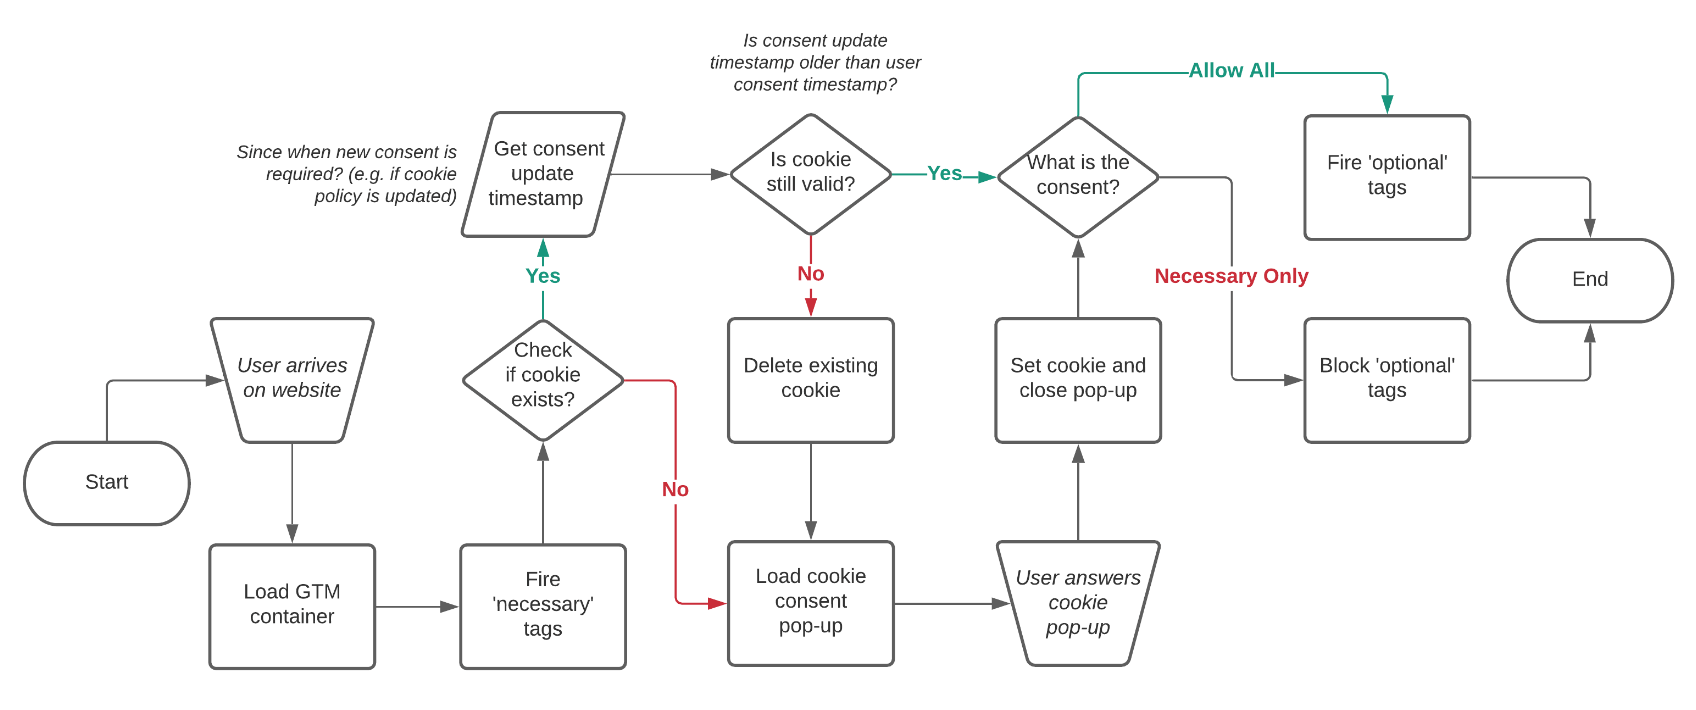
With that out of the way, let’s think about the ideal functionality of our pop-up:
- On first page load, fire ‘necessary’ tags only, and prompt user for consent to fire optional tags.
- Once user gives consent, drop a cookie storing their consent and fire the optional tags.
- If the consent cookie already exists, check if it is still valid. If yes, respect the past consent and not show the pop-up again.
- Reset consent if the past consent is no longer valid (in case you’ve made changes to your cookie policy and want fresh consent), and display the pop-up again.
Now that we have our ground-rules, we need to build our pop-up.
Developing the Consent Pop-up
Our pop-up will bring together three main elements: the design of the pop-up modal (HTML/CSS), the functioning of it (JavaScript), and the deployment of our cookie consent system (Google Tag Manager).
Pop-up Design (HTML/CSS)
As this is post is focused on JavaScript and Google Tag Manager, I’ll skip out on explaining the HTML and CSS part. Here is a demo of I’ve built (placed on top of a simple Bootstrap template). If you don’t see the pop-up, click on the “Reset Consent” button.
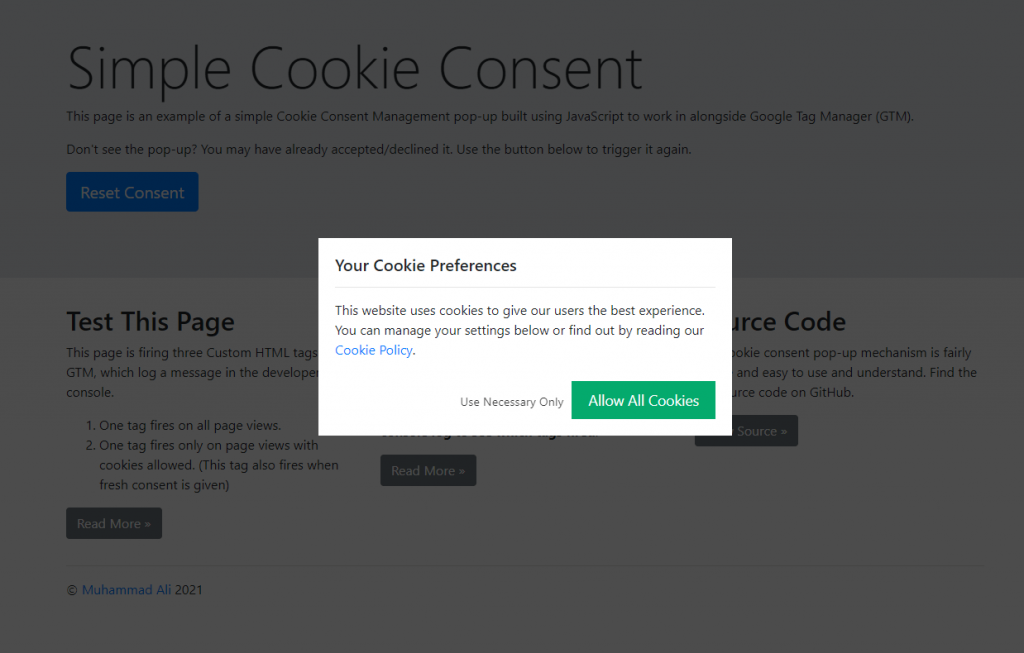
I’ve posted just the HTML and CSS of the pop-up modal on CodePen.
Although my demo is placed on top of a Bootstrap template in the demo, I haven’t used any Bootstrap classes in the pop-up HTML as we want this to be stand-alone and be able to work on any website. The CSS is also left barebones so it can inherit most styles from the parent page’s styles. You can customize this however you like.
Pop-up Functionality (JavaScript)
Now to move into the JavaScript part. This is where we will code the actual functionality of the pop-up and make sure it achieves what we set out in the plan above. Let’s review each step we need to take to build this.
1. Insert Pop-Up HTML/CSS
We don’t want this pop-up to be coded onto the page, that will require us to add it to each page of our website. We want it to be added to the page through our JavaScript. This way it can be added to any page we load our JavaScript on. I’m going minify the HTML and CSS and add it all as a variable. We are then going to append the CSS into the <head> of our page and append the HTML into the <body>. I will also keep the main ID of the pop-up container as a variable, in case you want to change it.
var consentModalId = 'simple-cookie-consent'; // ID of pop-up modal

// Specify HTML and CSS
var consentModalHTML = '<div class="cookie-consent-container"><div class="cookie-consent-notice"><h5>Your Cookie Preferences</h5><hr><p>This website uses cookies to give our users the best experience. You can manage your settings below or find out by reading our <a href="#">Cookie Policy</a>.</p></div><div class="cookie-consent-selection"><button value="false" class="cookie-consent-deny">Use Necessary Only</button><button value="true" class="cookie-consent-allow">Allow All Cookies</button></div></div>';
var consentModalCSS = '#'+consentModalId+'{height:100vh;width:100vw;position:fixed;top:0;left:0;resize:vertical;overflow:auto;z-index:999999999;background:rgba(0,0,0,.7)}#simple-cookie-consent .cookie-consent-container{position:absolute;top:50%;left:20px;right:20px;margin:-100px auto 0;background:#fff;padding:20px;max-width:500px}#simple-cookie-consent .cookie-consent-selection{text-align:right}#simple-cookie-consent button{border:none;padding:10px 20px;margin:10px 0 0 10px;background:0 0;font-size:1.1em}#simple-cookie-consent button.cookie-consent-allow{background-color:#04aa6d;color:#fff}#simple-cookie-consent button.cookie-consent-allow:focus,#simple-cookie-consent button.cookie-consent-allow:hover{background-color:#059862;cursor:pointer}#simple-cookie-consent button.cookie-consent-deny{padding:5px 0;font-size:.9em;opacity:.8}#simple-cookie-consent button.cookie-consent-deny:focus,button.cookie-consent-deny:hover{opacity:1;cursor:pointer}#simple-cookie-consent hr{margin:15px 0}';

function triggerModal() {
  // Insert HTML into the <body>
  var consentDiv = document.createElement('div');
  consentDiv.setAttribute('id', consentModalId);
  consentDiv.innerHTML = consentModalHTML;
  document.body.appendChild(consentDiv);

  // Insert CSS into the <head>
  var consentCSS = document.createElement('style');
  consentCSS.innerHTML = consentModalCSS;
  document.head.appendChild(consentCSS);
}
The pop-up will only be added when the function triggerModal()
2. Check Existing Cookie
To check if the cookie already exists or not, we can rely on the document.cookie property, which returns a string with all the readable cookies as a key-value pair, separated by semi-colons. We’ll need to parse that string to split it by semi-colons and then get just the value based on a key (cookie name). There are many ways to achieve this; I’m using a simple function found on PlainJS.
var cookieName = 'cookie-consent'; // Name of consent cookie

// Function to get cookie by name
var documentCookies = document.cookie;
function getCookie(name) {
  var v = documentCookies.match('(^|;) ?' + name + '=([^;]*)(;|$)');
  return v ? v[2] : null;
}
var userConsent = getCookie(cookieName); // Get consent cookie
Using this function, we can store our user’s consent value in the userConsent variable by calling this function with our cookieName. This will, of course, return null right now, because haven’t created the consent cookie yet.
3. Create New Consent Cookie
So let’s create that consent cookie. I’m going to wrap it in a function again, because we want it to fire only on a specific action from the user (their consent selection). A cookie’s value can only be plain text; several special characters like semi-colons are restricted. If we want to be smart, we can store the values in the JSON format; that will also help in future expansion coming up in a future post. We’re going to store the consent, and the timestamp of when the user gave that consent.
var cookieValidity = 12; // Cookie expiry in months
var cookieDomain = location.hostname; // Default location.hostname - Do not edit if unsure

// Function to set consent cookie
function setConsent(consent) {
  var cookieExpiry = new Date(); // Get current date
  cookieExpiry = new Date(cookieExpiry.setMonth(cookieExpiry.getMonth() + cookieValidity)); // Create expiry date
  document.cookie = cookieName+'={"consent":'+consent+',"timestamp": "'+Date.now()+'"}; domain='+cookieDomain+'; path=/; expires='+cookieExpiry+';'; // Create new cookie
}
Our function setConsent(consent) takes one argument, which will be the consent of the user (true or false). We then pass that into the document.cookie property to create a new cookie of that name (read more about cookies in JS), with JSON-style value holding key-value pairs for consent and timestamp.
The domain is set to the value of our cookieDomain variable, which defaults to the hostname the script is on. This should only be changed if the script is firing on a sub-domain but you want the cookie to be available to the entire site (e.g. script fires on www.example.com but you want the cookie to be available to entire domain .example.com.
The expiry is set to the value of the variable cookieExpiry (which is current date and time plus months we set in cookieValidity). This should also be wrapped inside our triggerModal() function, as this function is only called when the modal has triggered, and uses the modal elements being inserted by triggerModal().
This will result in a cookie with a value which looks something like:
{"consent":false,"timestamp": "1620076869367"}
As this is in JSON style, we will be able to turn it into a JSON object using the JSON.parse() method. That will allow us to get values by key later.
4. Bind Events to Selection Buttons
Next, we need to bind events to our modal buttons, where the user can allow all cookies (true) or only necessary ones (false). It is important we do this within the triggerModal() function, as that’s where the HTML is being appended.
var consentModal = document.getElementById(consentModalId);
var consentButtons = document.querySelectorAll('#'+consentmodalId+' .cookie-consent-selection button');
consentButtons = Array.prototype.slice.apply(consentButtons);
for (var i = 0; i < consentButtons.length; ++i) {
  consentButtons[i].addEventListener('click', function(e) {
    e.preventDefault();
    setConsent(this.getAttribute('value'));
    consentModal.parentNode.removeChild(consentModal);
  });
}
We’re simply looping through all the buttoons and binding a click event listener to them which: prevents the default behavior of the buttons; fires our consent function, passes the contents of value attribute as the argument, and then lastly; removes the modal from the page.
5. GTM Custom Event Trigger
If you’ve been paying attention, you’ll immediately realize one hole in our plan. If we want our GTM to fire page view tags based on the cookie value, then GTM will read the cookies on page view. The first time a user visits, the cookie won’t be present and so GTM will prevent any optional tags from firing. If the user then consents to all cookies; what about the tags which were already blocked on page view?
As the page view will have already blocked the optional tags, when gaining fresh consent, we will have to attempt to fire those tags again. We’ll use Google Tag Manager’s custom event trigger for it. We can fire a custom event which can be added as an additional trigger for your optional tags.
Remember, this only works if you are using Google Tag Manager. Let’s add the following to our setConsent(consent) function, after we set our cookie:
try {
  dataLayer.push({'event': 'cookie-consent'});
} catch(e) {
 console.log(e.message);
}
Note: This is a dataLayer function, so it will only work if you have GTM running. I’ve added it within a ‘try and catch’ so the script doesn’t break if used without GTM.
6. Conditionally Fire Consent Pop-Up
We now have everything we need to create our cookie consent pop-up’s functionality. We can bring it all together with an if/else condition to decide whether the pop-up should appear or not. So in short, we’re going to:
- Check if the consent cookie already exists.
- When the cookie already exists, check if the consent is still valid (based on a timestamp we provide). If user’s consent is older than our timestamp, then fire the pop-up, else do nothing.
- If the cookie does not exist, then trigger the consent modal pop-up.
- Store user’s consent in a cookie which expires after 12 months (or whatever you set).
See the plan at the top if you want a refresher.
var consentUpdate = 1620080800000 // Consent policy update timestamp, in milliseconds

//Check if user consent exists (userConsent variable will now has JSON-like value)
if(userConsent) { // if userConsent variable exists
  userConsent = JSON.parse(userConsent); // Parse into JSON object
  if(userConsent.timestamp < consentUpdate) { // Compare cookie timestamp with consentUpdate
    document.cookie = cookieName+'=; domain='+cookieDomain+'; expires=Thu, 01 Jan 1970 00:00:00 UTC; path=/;'; // Delete existing cookie
    triggerModal(); // Trigger pop-up
  }
} else {
  triggerModal();
}
We’ve created a new consentUpdate variable which can store your timestamp of whenever you update your privacy/cookie policy, or any time you want to gain fresh consent. The timestamp is in milliseconds since the Unix Epoch. We then check if the timestamp in the user’s cookie is less than the update timestamp. If it is, we delete the existing cookie and trigger the pop-up again. You can leave this at 0 or current timestamp, if you don’t want to use this feature.
7. Bring It All Together
We now have everything we need to create our cookie consent pop-up.
Check out the complete source code on GitHub.
I’ve wrapped it all in an anonymous function, added some more variables, and shifted some things around for cleanliness. There are also more comments in the code to make it easier to understand what’s happening where.
That’s it. Our cookie consent pop-up is now complete and we can start using it.
Use with Google Tag Manager Tags
I’m assuming you are fairly familiar with GTM so I’ll just list the steps. Here’s what you need to do to use this consent pop-up with Google Tag Manager:
- Create a new Custom HTML tag in GTM and load the JavaScript within
<script>tags (you can load the JavaScript directly via your GTM tag too, or save it as a file and load that). - Create a new 1st Party Cookie variable, name it “cookie-consent”, with the Cookie Name being our consent cookie’s name (default is
cookie-consent). - Set up a Custom Event trigger, name it “Cookie Consent – No” with:
- Event name name matching
.*(tick “Use regex matching”), - Fire on Some Custom Events, where variable cookie-consent does not contain
"consent":true. (We use a does not contain condition so this exception applies if the cookie has any other value or if it does not exist and is undefined).
- Event name name matching
- Set up a Custom Event trigger, name it “Cookie Consent Set”, with the Event Name
cookie-consentto fire on All Custom Events. - Create a tag which shouldn’t fire when consent is false and:
- Add your regular triggers (e.g. All Pages).
- Add the new “Coookie Consent Set” trigger to it too.
- Under Exceptions, add the Add the “Cookie Consent – No” trigger.

After you’ve done the above, you should end up with tags that looks like the example screenshot. Congratulations, you now have tags that won’t fire when cookie consent is not true (exception).
For tags that didn’t fire on page view because of lack of consent, our custom event trigger “Cookie Consent Set” will fire them when the user consents. If you have tags that have conditional triggers (e.g. if a tag fires only on specific pages), you must duplicate this custom event trigger with the same conditions. You don’t need to do this for other triggers though, such as clicks, or other custom events, as those will likely happen after the user has answered the consent pop-up and our exception will test whether they are allowed or not.
The exception trigger “Cookie Consent – No” should stay on all optional tags. It is set up as a custom event with a RegEx that matches all events; this will make GTM check it on all kinds of triggers (page view, click, other custom events, etc…)
Summary
Woohoo! We’ve done it. We’ve created a cookie consent pop-up that achieves everything we planned in the starting.
Test the final result on this demo. Or view entire source code on GitHub.
Let’s do a quick recap of what we’ve built:
- This cookie consent pop-up stores a cookie with the value of user’s consent as true/false and a timestamp of when the user gave the consent.
- It’s built to work alongside Google Tag Manager and can be fired straight from GTM too.
- The cookie consent pop-up appears if the consent cookie is missing, or if it is no longer valid, based on when the gave their consent and when we’ve asked it to be reset.
- This mechanism is extremely lightweight; exluding comments, it’s less than 50 lines of JavaScript and the minified version is under 3kb!
- Still, be wary of using this in production.
Shortcomings
Our consent mechanism does have some drawbacks.
- It does not allow restricting non-GTM scripts. I do plan on adding that, so I might do it either as an update to this, or as a separate post.
- The consent it stores is also just binary, a true or false for optional tags. It does not allow customizing consent by categories such as analytics, performance, marketing, or others. There’s a part two coming up soon to cover that!
- Lastly, please remember that I have not done any kind of thorough testing on this. If you plan to use this in production, please test and use on your own risk. If you’re looking for an open-source cookie consent manager to use in production, check out Klaro!
Let me know what you think about this exercise and if you found it useful. Spotted a bug or have an idea on how to improve this? Please let me know in the comments below.